Stripe Integration
Why Track Stripe Checkouts with Tracklution?
To maximize the effectiveness of your ad campaigns, it's essential to track real conversions, attribute them correctly, and provide ad platforms with reliable data. Tracking Stripe checkouts can be challenging due to external checkout sessions, tracking code limitations, and cross-domain issues. Tracklution simplifies this process with an easy, no-code solution that combines website visitor data with Stripe purchase data through server-side tracking. This ensures precise tracking even for post-trial or recurring payments, enabling you to:
- Feed real conversion data with actual revenue to ad platforms like Google Ads, Meta, and TikTok.
- Analyze your complete conversion funnel by integrating Stripe data with Google Analytics 4.
- Optimize ad performance and reduce customer acquisition costs (CAC) with high-quality data.
Track Stripe checkouts seamlessly and take your conversion tracking to the next level - all without technical work.
How to Enable Stripe Conversion Tracking
Select the installation method according to your checkout process:
- Method 1 works for you if you use Stripe payment links (and do not collect customer data before checkout). Jump to this chapter
- Method 2 works for you if you collect customer data before checkout (for example, the customer logs in and gives an email address before checkout). Jump to this chapter
Installation method 1 (for Stripe payment links)
Watch a video walkthrough:
1. Implement Tracking to Your Website (if you haven't already):
- Create an account and install Tracklution’s 1st-party tracking to capture traffic source data (such as UTM tags and click IDs) leads, sign-ups, account creations and other funnel events. Type in your website and Tracklution will recommend the best installation method for you.
- For Stripe conversion tracking, it is required to implement the Tracklution Main Script and PageView. You can leave out the other events if you don’t want to track anything else than successful checkouts from Stripe.
2. Redirect the user to a “Thank you” page after purchase with Stripe’s CHECKOUT_SESSION_ID.
- To do this in Stripe, go to Payment Links → Edit payment link → After payment → Don’t show confirmation page (Redirect customers to your website.)
- The URL of the “Thank you” page should look like this:
example.com/thank-you/?stripe_session_id={CHECKOUT_SESSION_ID}3. Integrate Stripe to Tracklution with Webhooks
-
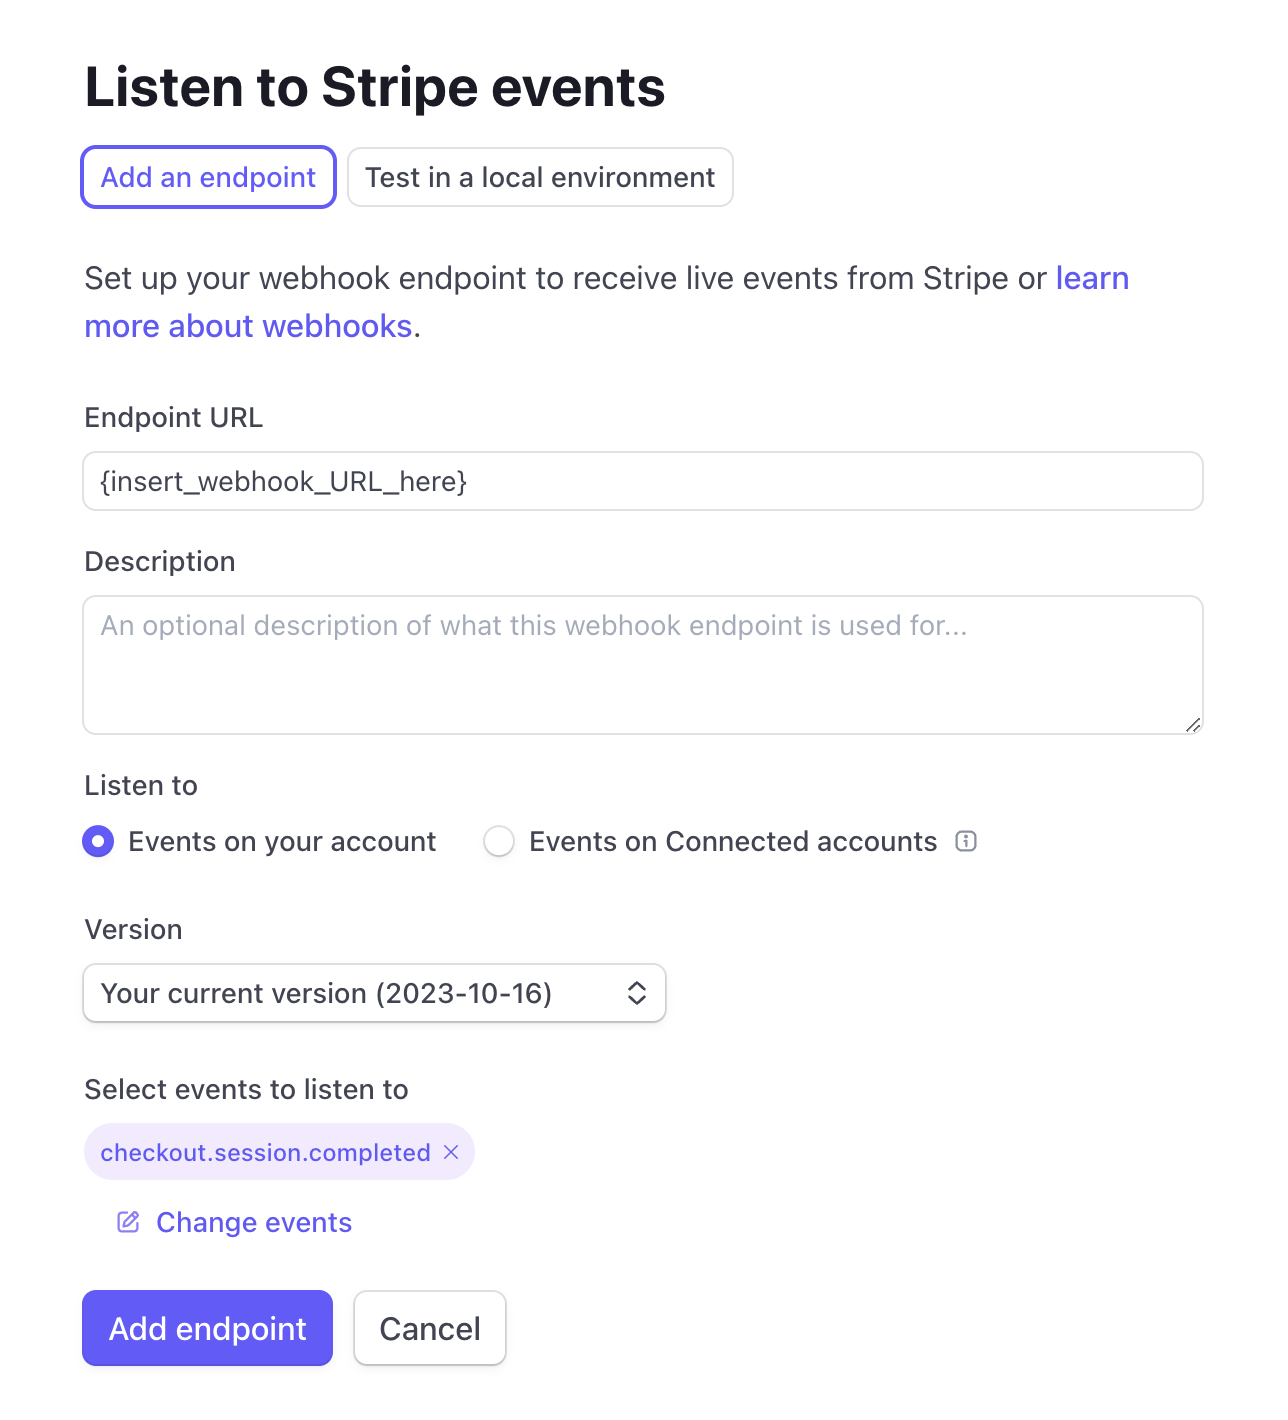
Go to Stripe, open Developers → Webhooks → Add endpoint
-
Endpoint URL field: Copy-paste URL from Tracklution instructions. Endpoint URL contains your unique Tracking Container Key.
-
Select events to listen to: From the list, select 'checkout.session.completed'

4. Activate Ad Platform Connections
Once you have completed steps 1, 2, and 3, Tracklution will enrich your website data with Stripe conversion data to pass accurate conversion events, such as purchases originating from Stripe, back to ad platforms and Google Analytics 4. Activate the data destinations you want to use, and you’re ready to go! Read more about Connectors here.
Installation method 2 (customer data is collected before checkout)
1. Implement Tracking to Your Website (if you haven't already):
- Create an account and install Tracklution’s 1st-party tracking with Google Tag Manager or use direct integrations with platforms like Shopify and WooCommerce.
- Capture traffic source data (such as UTM tags and click IDs), leads, sign-ups, account creations and other funnel events.
- Make sure you send ContactInfo event to Tracklution so we can tie the Stripe event to the website session using that information. Read more about ContactInfo from here .
2. Integrate Stripe to Tracklution:
- Access your Stripe account to set up automation via a webhook. Go to Stripe, open Developers - Webhooks - Add endpoint (Note! The Webhooks tab will be renamed to Event Destinations)
- Create a ‘CustomerCreated’ event that enables Tracklution to tie further conversion events from Stripe into the correct user. The endpoint URL should be your unique webhook endpoint provided in your Tracklution instructions (screenshot below), complemented with track=CustomerCreated and source=stripe parameters. The correct triggering event in Stripe is customer.created.

- Configure any other events you wish to track; for example, you can create events for actual purchases (charge.succeeded), when a payment method is set (payment_method.attached), if a payment fails (charge.failed), and so forth.
- Tracklution will automatically read payloads coming from Stripe, so you don’t have to lift a finger after webhook notifications are set! Just remember to use the correct event triggers in Stripe and parameters track=[EventName] and source=stripe in your Tracklution webhook.

3. Activate Ad Platform Connections:
- Once you have completed steps 1 and 2, Tracklution will enrich your website data with Stripe conversion data to pass accurate conversion events, such as purchases originating from Stripe, back to ad platforms and Google Analytics 4.
- Activate the data destinations you want to use, and you’re ready to go! Read more about Connectors here .